

How to Fix a Moka Pot Gasket Leak (2026 Guide)
Table of Contents
- First: Confirm the Leak Is Coming From the Gasket
- Step 1: Disassemble and Inspect the Rubber Seal and Threads
- Step 2: Clean the Sealing Surface and Filter Plate
- Step 3: Lubricate and Reassemble With Correct Tightening Torque
- How Often to Replace Moka Pot Seal: Material and Signs
- Moka Pot Gasket Replacement: Silicone vs. Rubber and Fit
- Troubleshooting New Equipment and Pressure Issues
- Post-Repair Testing: The Water-Only Brew Check
- Frequently Asked Questions
Last Updated: September 6, 2026
A moka pot gasket leak is the most common failure point on a stovetop espresso maker, and it is almost always fixable in under fifteen minutes without buying a new pot. The rubber seal between the top and bottom chambers degrades, shifts, or collects coffee oils, allowing steam and water to escape during brewing. This guide from fiammaferro.com walks through a complete diagnostic and repair sequence, from confirming the leak source to testing the fix.
The moka pot gasket is a ring-shaped seal that creates an airtight barrier between the boiler chamber and the collector. When it fails, you will notice coffee spurting from the sides, a hissing sound during extraction, or a pool of liquid on the counter. Before buying replacement parts, confirm the leak originates from the gasket rather than a cracked boiler, a loose safety valve, or a bent filter plate.
First: Confirm the Leak Is Coming From the Gasket
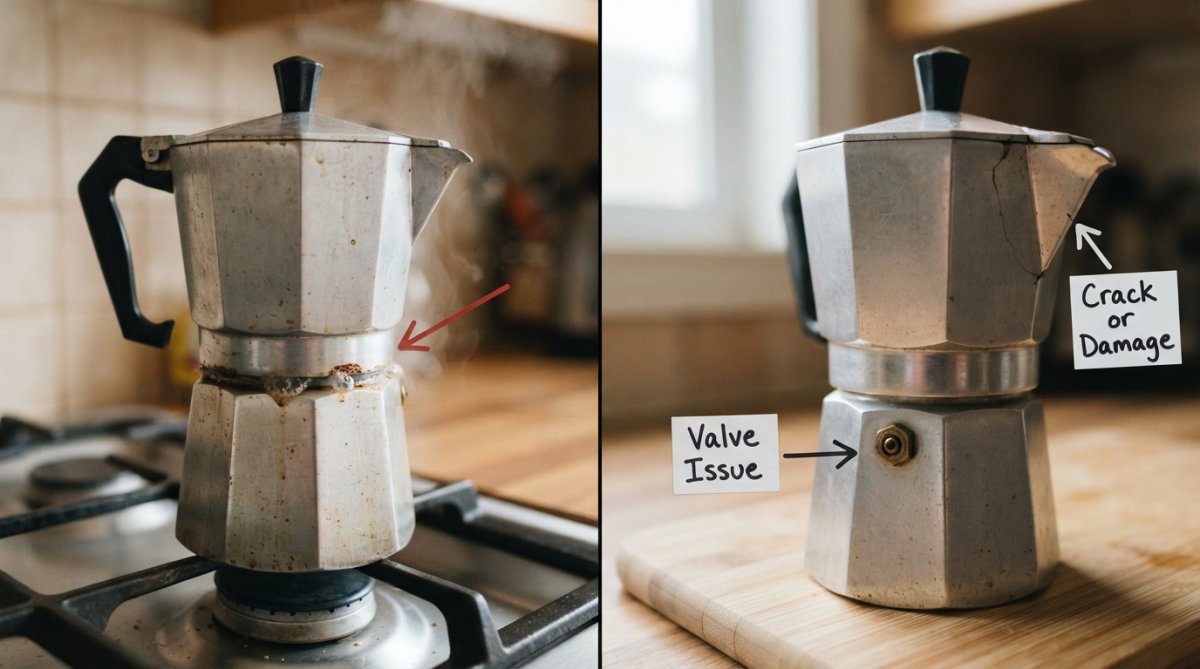
Before disassembling anything, pinpoint the exact leak origin. A moka pot has three common leak points, and each requires a different fix. Misdiagnosing a safety valve issue as a gasket leak will waste your time and could lead to a dangerous repair attempt.
Visual Leak Identification Guide
Run a dry visual inspection first, then a controlled water test if needed. Follow this diagnostic flow:
-
Check the midsection seam (the horizontal line where the top and bottom chambers meet).
- Visual sign: Coffee seeps or spurts horizontally from this seam during brewing, often with a hissing sound. You may see brown residue trails running down the boiler.
- Likely cause: Worn, misaligned, or dirty gasket. This is the most common leak and is fixable with the steps below.
-
Check the safety valve (the small metal stem or button on the side of the lower boiler chamber).
- Visual sign: Liquid or steam escapes from the valve stem itself, often in a steady jet or with a loud hiss, especially early in the brew cycle.
- Likely cause: Debris (coffee grounds, scale) holding the valve partially open, or a weakened valve spring. This is not a gasket issue. Do not attempt to seal this valve; clean it or replace the valve assembly.
-
Check the spout and the upper chamber interior.
- Visual sign: Drips come from the spout area or you see coffee pooling inside the collector before it flows out. Cracks in the metal or a damaged spout are the culprits.
- Likely cause: A cracked collector or a damaged spout. This requires part replacement, not a gasket fix.
-
Check the threaded connection (the area where the two chambers screw together).
- Visual sign: Steam rises from the threads themselves, even before coffee appears in the upper chamber. This often happens when the pot is overtightened, causing the threads to bind and the chambers to seat at an angle.
- Likely cause: Overtightening, cross-threading, or stripped threads from repeated forceful assembly.
The Water-Only Diagnostic Test
If the leak is intermittent or unclear, run a controlled water test before adding coffee. This isolates the leak source without the mess of coffee grounds.
- Fill the boiler with cold water up to the safety valve level.
- Leave the funnel empty and the filter plate out.
- Assemble the pot and place it on the stove at medium heat.
- Watch the three zones: the seam, the safety valve, and the spout.
| Leak Location | Visual Sign | Likely Cause | Next Step |
|---|---|---|---|
| Midsection seam | Water seeps sideways between chambers | Worn or misaligned gasket | Proceed to Step 1: Disassemble and Inspect |
| Safety valve stem | Water jets from the side valve | Debris obstruction or worn valve spring | Skip to Troubleshooting New Equipment and Pressure Issues |
| Spout or collector | Water drips from upper chamber | Cracked metal or damaged spout | Contact manufacturer for replacement parts |
| Threaded connection | Steam rises from threads during brew | Overtightening or stripped threads | Check thread condition and re-seat carefully |
If the leak matches the midsection pattern, proceed to disassembly. If you see signs of a safety valve issue, skip ahead to the troubleshooting section. This flow prevents the common mistake of replacing a gasket when the real problem is a blocked safety valve or a cracked collector.
Step 1: Disassemble and Inspect the Rubber Seal and Threads
Unscrew the top chamber from the boiler while the pot is completely cool and empty. Hold the base firmly and twist the collector counterclockwise, keeping the pot upright so the funnel and filter plate do not spill grounds.
Once separated, remove the filter plate and the rubber seal from the upper chamber. Inspect the gasket under bright light for three failure modes: visible cracks or tears, a flattened or compressed profile, and hard, brittle sections that have lost elasticity. A healthy gasket springs back when pressed; a failing one feels stiff or shows permanent deformation.
Examine the threads on both chambers for damage. Aluminum oxidation can build up on the threaded connection and prevent the chambers from seating fully, creating a gap for steam to escape. Stainless steel pots resist this corrosion but still accumulate coffee oils. Look for burrs, nicks, or stripped sections that would prevent a snug fit.
Step 2: Clean the Sealing Surface and Filter Plate
Residue buildup is the quiet killer of moka pot seals. Coffee oils polymerize on the sealing surface and the gasket, creating a hard, tacky film that breaks the airtight seal even when the gasket is still serviceable.
Wash the gasket, filter plate, and both chamber rims in warm water with mild dish soap. Do not use abrasive scrubbers or metal brushes, which scratch the sealing surface and create microscopic channels for steam to escape. For stubborn residue, soak the parts in warm water and white vinegar for fifteen minutes, then rinse thoroughly. The funnel and filter plate need particular attention, since debris in the filter holes can cause pressure buildup that forces steam past the gasket.
Dry every component completely before reassembly. A wet sealing surface prevents the gasket from seating properly and can cause a leak on the next brew.
Step 3: Lubricate and Reassemble With Correct Tightening Torque
Light lubrication on the gasket improves the seal and extends the life of the rubber. Apply a thin film of food-grade vegetable oil to the outer edge of the gasket with your fingertip, then wipe off any excess. This helps the seal slide into place and maintains flexibility.
Place the gasket into the upper chamber, pressing it evenly so it sits flat in the recess. Drop in the filter plate, then add coffee grounds to the funnel without tamping. Fill the boiler with water up to the safety valve level, and screw the chambers together.
The correct tightening torque is firm but not forceful. Turn the collector until you feel resistance, then give it an additional quarter turn. Overtightening compresses the gasket unevenly, distorts the threads, and can cause leaks by preventing the chambers from seating at the correct angle. If the pot feels hard to thread together, back off, check the gasket alignment, and try again.
How Often to Replace Moka Pot Seal: Material and Signs
Most manufacturers recommend replacing the moka pot gasket every 12 to 18 months with regular use, but the actual interval depends on brewing frequency and the material of the seal. A pot used daily will wear faster than one used weekly, and heat accelerates the natural aging of rubber compounds.
The moka pot seal shows wear through several reliable signs: visible cracking or splitting, a flattened profile that no longer springs back, a hard or brittle texture, and persistent leaks that return after cleaning and proper reassembly. If you notice any of these, replacement is the only durable fix. Cleaning and lubrication cannot restore a gasket that has lost its elasticity.
| Sign of Wear | Action | Expected Result |
|---|---|---|
| Visible crack or tear | Replace gasket | Eliminates steam path |
| Flattened profile | Replace gasket | Restores airtight seal |
| Hard, brittle texture | Replace gasket | Restores compression |
| Leak after cleaning | Replace gasket | Resolves persistent leak |
Moka Pot Gasket Replacement: Silicone vs. Rubber and Fit
When replacement becomes necessary, the material choice matters more than most guides admit. The two options, traditional rubber (often Buna-N or nitrile) and food-grade silicone, behave very differently under the thermal cycling of a stovetop brewer. Choosing the wrong one can lead to premature failure or a poor seal.
Material Compatibility: Heat Tolerance and Lifespan
Rubber (Buna-N/Nitrile)
- Heat tolerance: Rubber gaskets typically withstand continuous temperatures up to 212°F (100°C), which is right at the boiling point of water. During a normal brew cycle, the boiler interior can briefly exceed this, especially on high heat. This repeated exposure causes rubber to harden, crack, and lose its elasticity faster than silicone.
- Oil absorption: Rubber is porous at a microscopic level and readily absorbs coffee oils. Over time, these oils polymerize inside the material, making it stiff and tacky. This is why rubber gaskets often fail with a hard, flattened profile after 12-18 months of daily use.
- Cost: Rubber gaskets are cheaper upfront, typically $5-$8 for a standard 3-cup pot.
Food-Grade Silicone
- Heat tolerance: Silicone gaskets are rated for continuous service up to 400°F (204°C) and can handle intermittent spikes up to 500°F (260°C) (the FDA). This margin means silicone does not degrade from normal stovetop heat, even if you occasionally run the pot hotter than ideal.
- Oil resistance: Silicone is non-porous and does not absorb coffee oils. It wipes clean easily and maintains its flexibility far longer than rubber. Most manufacturers, including Bialetti, now offer silicone as the standard replacement material.
- Lifespan: With regular care, a silicone gasket typically lasts 24-36 months before showing signs of wear. The trade-off is a slightly higher upfront cost, usually $8-$12 for a standard pot.
| Material | Max Continuous Heat | Oil Absorption | Typical Lifespan (Daily Use) | Cost Range |
|---|---|---|---|---|
| Rubber (Buna-N) | ~212°F (100°C) | High | 12-18 months | $5-$8 |
| Food-Grade Silicone | ~400°F (204°C) | None | 24-36 months | $8-$12 |
How to Measure and Match the Correct Fit
A gasket must match the exact outer diameter, inner diameter, and thickness of your pot's model. Measure as follows:

- Outer diameter: Measure the recess in the upper chamber where the gasket sits. Use a caliper for accuracy; a ruler works for a rough check.
- Thickness: Measure the gasket's cross-section with a caliper. Standard moka pot gaskets range from 2mm to 3.5mm thick depending on the pot size.
- Inner diameter: This must match the filter plate's outer edge so the gasket seats flush against it.
A gasket that is too thin will not create enough compression for an airtight seal, allowing steam to escape around the edges. A gasket that is too thick prevents the chambers from threading together fully, which can strip the threads or cause the pot to sit crooked on the stove.
Model-Specific Fit: The 12-Cup Stainless Steel Example
For the Linea Suprema 12-cup stainless steel moka pot, the boiler capacity is 600ml, and the gasket recess is machined to a precise tolerance. Using a generic gasket from a different brand often results in a poor fit because aluminum and stainless steel pots have different thread pitches and sealing surface geometries. Aluminum pots use a softer, more compressible gasket to accommodate the metal's expansion rate; stainless steel pots require a gasket that holds its shape under higher thermal stress.
For the Linea Suprema 12-cup stainless steel moka pot, fiammaferro.com offers an OEM silicone gasket set with two food-grade replacement rings. These seals match the precise dimensions of the 600ml boiler, providing a leak-proof fit that maintains proper pressure for richer extraction. The 2-pack also gives you a spare for the next replacement cycle.
Troubleshooting New Equipment and Pressure Issues
A leak on a brand-new moka pot points to different causes than wear on an old one. New pots rarely have failed gaskets, so check assembly issues first: the gasket may not be seated flat in its recess, the chambers may be cross-threaded, or the pot may have been overtightened on first use.
Residual manufacturing oils can also interfere with the seal on new equipment. Wash all removable parts thoroughly before the first brew, and run one water-only cycle to clear any machining residue from the boiler and threaded connection.
Pressure issues deserve separate attention. If steam escapes from the safety valve during normal brewing, the valve may be obstructed by coffee grounds or scale. The safety valve is a pressure relief mechanism, and it should remain closed during regular operation. Clean the valve stem carefully with a toothpick, and if the leak persists, the valve spring may need replacement. Never block or seal a functioning safety valve, as this creates a dangerous pressure buildup risk (the CDC). For guidance on safe operation and pressure control, consult general stovetop espresso safety guidance and your pot's specific instruction manual.
Post-Repair Testing: The Water-Only Brew Check
Before brewing coffee and risking another mess, run a water-only test to verify the repair. Fill the boiler with cold water up to the safety valve, leave the funnel empty, and assemble the pot completely. Place it on medium heat and watch the seam during the brew cycle.
A successful test shows no steam escaping from the midsection and a steady flow of water rising into the upper chamber. The brewing temperature should stay in the normal range, and the safety valve should remain closed. If the seam stays dry and the flow rate looks normal, your gasket repair is complete.
If the pot still leaks during the water-only test, disassemble and recheck the gasket seating, the thread condition, and the sealing surface for residue you may have missed. A persistent leak after a new gasket and thorough cleaning suggests either a damaged sealing surface on the pot itself or a gasket size mismatch. In that case, consult manufacturer-specific replacement guidance to confirm you have the correct part for your model.
Regular preventative care extends the life of your moka pot gasket significantly. Rinse and dry the seal after every use, apply a light coat of vegetable oil monthly, and store the pot with the chambers separated so the gasket is not under constant compression. With this routine, most silicone gaskets will deliver leak-free brewing well past the 18-month mark.
Fixing a moka pot gasket leak comes down to systematic diagnosis: confirm the source, clean the sealing surfaces, replace worn parts, and test before brewing. Fiamma & Ferro builds stainless steel moka pots engineered for durability, and our OEM silicone gasket sets are designed to restore your pot to leak-free performance with food-grade materials that resist heat and coffee oils. Get started with a replacement gasket set and bring your moka pot back to full brewing pressure.
Frequently Asked Questions
Can you replace the seal on a moka pot?
Yes, the seal, often called the gasket, is a standard wear item designed for replacement. You can remove the old one by hand or with a soft tool after the pot cools. For a proper fit, use a gasket made for your specific pot size and model. For example, the Linea Suprema 12-cup uses a specific silicone ring. Replacing a worn gasket is the primary fix for leaks around the midsection.
How often should I replace my moka pot seal?
Most manufacturers suggest replacing the seal every 12 to 18 months with regular use, but inspect it every few months. If the rubber seal feels hard, loses its flexibility, shows cracks, or no longer springs back when pressed, it is time for a moka pot gasket replacement. A pot used daily may need a new seal sooner than one used weekly.
Why is my brand new moka pot leaking from the middle?
A leak from the middle of a new pot usually points to assembly or debris, not a faulty part. First, ensure the gasket is seated flat inside the top chamber's groove. Second, clean the threads and sealing surfaces to remove manufacturing residue. Finally, tighten the top chamber firmly, but do not force it. You should feel resistance, not strain.
How tight should I screw my moka pot together?
Tighten the top chamber until you meet firm resistance, then stop. Think of it like closing a jar: secure, not strained. The metal-to-metal contact of the threads stops at the gasket, which compresses to create the airtight seal. Over-tightening can warp the threads or push the gasket out of place, causing leaks.