

Stovetop Espresso Maker Grind: The Complete Guide
Table of Contents
- What You'll Need Before You Dial In Your Grind
- The Ideal Moka Pot Grind Size: Table Salt, Not Powder
- Why Espresso Grind Is Too Fine for a Stovetop Espresso Maker
- How Grind Size Affects Extraction, Pressure, and Flavor
- Step-by-Step: Dialing In Your Grind Setting
- Choosing a Manual Coffee Grinder for Moka Pot Brewing
- Stovetop Espresso Maker Troubleshooting: Common Brew Problems
- How Water Temperature Changes Your Grind Requirements
- Frequently Asked Questions
Last Updated: September 20, 2026
What You'll Need Before You Dial In Your Grind
Getting the stovetop espresso maker grind right starts with three things: fresh whole beans, a burr grinder, and a small kitchen scale. This guide from fiammaferro.com covers the full process, from micron targets to fixing a bitter or weak cup.

A common mistake is buying pre-ground coffee and hoping for the best. Pre-ground coffee is ground for drip machines, not moka pots. The particle size is usually too coarse, and the coffee has already lost much of its aroma.
Here is what to gather before you start:
- Whole coffee beans, roasted within the last few weeks
- A burr grinder with adjustable settings
- A scale that reads in grams
- Your stovetop espresso maker, cleaned and dry
- A timer or your phone
You do not need an espresso machine or a lab setup. You need control over one variable: particle size. Everything else follows from there.
The Ideal Moka Pot Grind Size: Table Salt, Not Powder
The ideal moka pot grind size sits between drip coffee and espresso. It should feel like table salt or granulated sugar when you rub it between your fingers, not like flour and not like sand.
That texture matters more than any number on a dial. Grind too fine and the coffee turns bitter and muddy. Grind too coarse and hot water rushes through without pulling out much flavor.
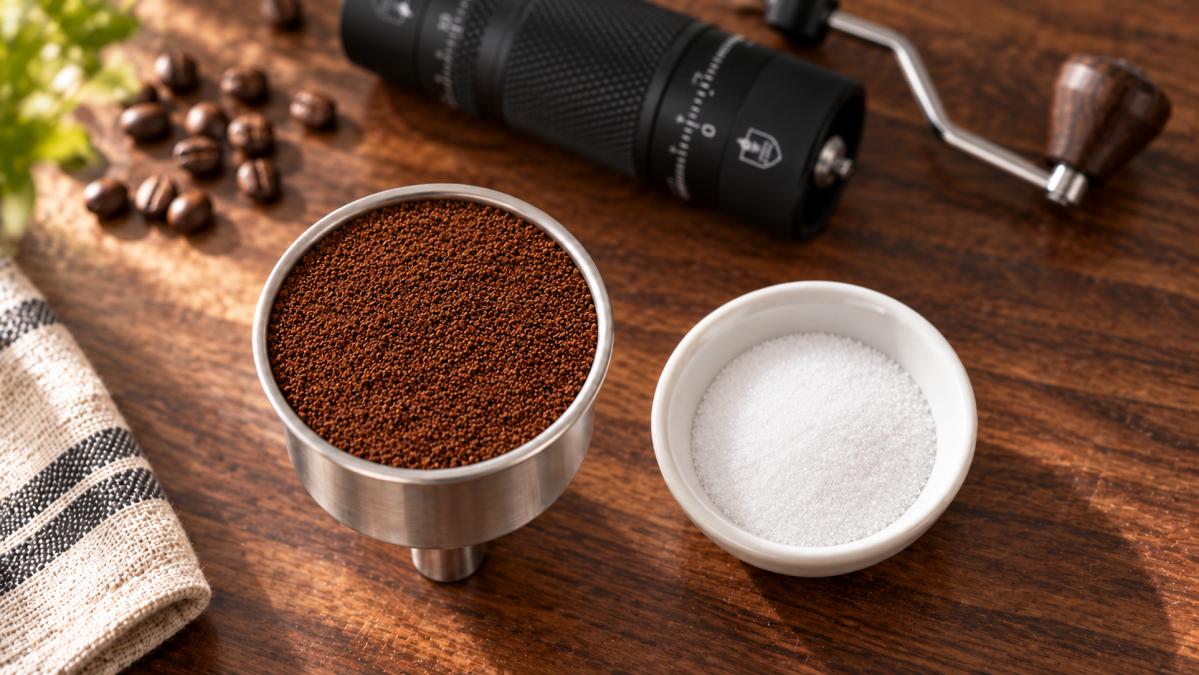
Micron Targets: What 400 to 500 Microns Looks Like
Most moka pot guides stop at "medium-fine" and leave you guessing. A more useful target is a particle size of roughly 400 to 500 microns.
For context, espresso typically sits below 400 microns, while drip coffee often runs above 600. That narrow 400 to 500 window is where moka pots brew best.
You will not measure microns at home without a sieve set. But knowing the target helps you interpret grinder charts and dial in faster. If your grind looks powdery and clumps, you are likely under 400. If it looks like coarse sand, you are probably over 500.
How to Calibrate Without a Micron Sieve
You do not need lab gear to land inside the 400 to 500 micron window. You need a repeatable reference and one controlled test. Here is the calibration method most home brewers never get told:
- Build a visual reference card. Spread a pinch of table salt on a white plate. That is your 400 to 500 micron anchor. Photograph it next to your grounds under the same light so you can compare batches later.
- Run the pinch-and-smear test. Rub a pinch of grounds between your thumb and index finger. At 400 to 500 microns you feel grit that dissolves with light pressure, individual particles are still detectable, but they do not cut into your skin the way espresso powder does.
- Check the basket fingerprint. After you fill the basket level and lift it, the surface should hold a soft impression of your fingertip and then relax. If the impression stays sharp like wet sand, you are too fine. If the surface crumbles and shows gaps, you are too coarse.
- Weigh a fixed dose. A level basket in a standard 3-cup moka pot holds roughly 15 to 18 grams of medium-fine coffee. Locking the dose lets you judge grind changes without dose noise.
- Time the first drip. With preheated water and a low flame, the first coffee should appear somewhere between 90 seconds and 2 minutes. Faster than that usually means the grind is too coarse; much slower points to too fine.
What the Numbers Actually Tell You
Micron ranges are useful because they translate vague words into a measurable target. Once you know you are aiming for 400 to 500 microns, three things become easier:
- Reading grinder charts. When a manufacturer lists a setting as "medium," you can check whether their published particle range lands inside your window instead of trusting the label.
- Diagnosing a bad cup. A bitter, muddy shot usually means you drifted below 400 microns. A thin, sour cup usually means you drifted above 500.
- Switching beans. A dark roast at the same grinder setting often produces a slightly finer effective particle than a light roast, so you may need to open the setting by a click or two to stay in range.
The goal is not to hit an exact number. It is to know which side of the window you are on so your next adjustment moves in the right direction.
Why Espresso Grind Is Too Fine for a Stovetop Espresso Maker
Espresso grind is too fine for a stovetop espresso maker because a moka pot builds far less pressure than an espresso machine. A pump machine pushes water through the puck at high pressure. A moka pot relies on steam and a gentle rise of hot water.
When you load espresso-fine grounds into a moka pot basket, several things go wrong:
- Water struggles to pass through the coffee bed
- Pressure builds unevenly and finds weak spots
- The brew sputters and spits instead of flowing
- The cup tastes harsh, bitter, and over-extracted
The fix is simple. Back the grind off toward medium-fine and let the pot do its job. If you are coming from espresso, expect to open your grinder setting by several clicks.
How Grind Size Affects Extraction, Pressure, and Flavor
Grind size controls how fast water moves through the coffee, and that flow rate decides what ends up in your cup. Smaller particles expose more surface area, so water pulls out flavor faster. Larger particles slow that process down.
Pressure plays a role too. A finer grind creates more resistance in the basket. That raises pressure inside the pot and can push the brew toward over-extraction. A coarser grind lowers resistance, which speeds up brew time and can leave flavor behind.
The goal is balance. You want enough resistance to build gentle pressure, but not so much that the flow stalls. When the grind is right, coffee drips out in a steady, honey-like stream.
Boulders, Fines, and Channeling in the Coffee Bed
No grinder produces perfectly even particles. Every grind has two problem children: boulders and fines.
Boulders are oversized chunks that water passes over without fully extracting. They leave sour, underdeveloped notes in the cup.
Fines are tiny dust-like particles that over-extract fast. They add bitterness and can slip through the filter into your drink.
When fines clump in one spot, water takes the path of least resistance through the coffee bed. That is called channeling, and it produces an uneven, inconsistent cup. A quality burr grinder reduces both problems by producing a more uniform particle size.
Step-by-Step: Dialing In Your Grind Setting
Dialing in your stovetop espresso maker grind is a repeatable process, not guesswork. Start coarse, then work finer until the cup tastes right.
- Set your grinder to a medium setting as a baseline
- Fill the basket level with grounds, without pressing them down
- Brew and note the flow: speed, color, and sound
- Taste the cup and check for bitterness or sourness
- Adjust one or two clicks finer or coarser
- Repeat until the flow is steady and the flavor is balanced
- Write down the setting that worked for future bags
Each coffee behaves differently. A dark roast may need a slightly coarser grind than a light roast. Old beans also grind differently than fresh ones, so expect small adjustments over time.
Starting Points for Common Home Grinders
"Medium-fine" is useless until you translate it into clicks on the grinder sitting on your counter. These are reasonable starting points for moka pot brewing, not gospel, every unit drifts slightly, so treat them as a first brew and adjust from there.
- Baratza Encore (and Encore ESP): Start around setting 14 to 16 on the Encore's 0-40 scale. The ESP's espresso-oriented range runs finer, so begin near 18 to 20 and step coarser if the flow stalls.
- Baratza Virtuoso+: Start near 14 to 16. The stepped ring makes it easy to move one notch at a time.
- Comandante C40: Start around 18 to 22 clicks from zero. Moka sits comfortably coarser than espresso (typically 8-12 clicks) and finer than pour-over (often 25-30).
- 1Zpresso JX-Pro: Start near 2 full rotations plus 4 to 6 numbers. The external adjustment ring lets you nudge in small increments without losing your reference.
- Timemore C2 / C3: Start around 12 to 14 clicks. These grinders run slightly finer per click than the Comandante, so begin a touch coarser than you expect.
- Fellow Ode Gen 2: Start near setting 4 to 5. The Ode is designed for filter coffee, so moka pot sits at the fine end of its usable range.
A Decision Tree for Your Next Adjustment
Instead of guessing which way to move, use the cup and the flow to pick your next step:
- Sputtering, spitting, bitter, muddy cup → grind is too fine. Coarsen by 2 to 4 clicks (or one full number on a stepped grinder).
- Fast, pale flow and a sour, thin cup → grind is too coarse. Fine by 2 to 4 clicks.
- Steady honey-like drip but still bitter → grind is close; lower the flame before touching the grinder again.
- Steady drip but sour → fine by 1 to 2 clicks only. Small moves protect the flow you already have.
- Flow stalls completely → coarsen by 4 to 6 clicks, then work back down in single steps.
Recording Your Settings So They Transfer
A grind setting only helps if you can repeat it. Log four things for every brew: the grinder and its setting, the bean and roast date, the dose in grams, and the time to first drip. After three or four brews you will see a pattern, for example, that your Comandante wants 20 clicks for a medium roast but 22 for a dark roast on the same beans. That log turns a lucky cup into a repeatable one.
Choosing a Manual Coffee Grinder for Moka Pot Brewing
A manual coffee grinder for moka pot brewing gives you more control than most budget electric models. Blade grinders chop beans into random sizes, which creates boulders and fines in the same batch.
Look for these features:
- Conical burrs, not blades
- A wide adjustment range with fine steps
- Consistent particle size at medium-fine settings
- Durable burr material for long-term use
- A comfortable handle and stable base
The Fiamma & Ferro Titanium+ Precision Manual Grinder fits this brief well. It uses CNC-cut titanium-coated burrs, offers 180 grind settings, and is built to grind over 500kg of beans. That range makes it easy to move between moka pot, pour-over, and French press without buying separate tools. It also carries a 10-year limited burr performance warranty.
If you want both tools in one purchase, the Espresso Ritual Bundle pairs the Titanium+ grinder with a stainless steel stovetop espresso maker for a complete setup.

Stovetop Espresso Maker Troubleshooting: Common Brew Problems
Stovetop espresso maker troubleshooting usually comes down to grind, heat, or dose. Fix those three and most problems disappear.
Problem |
Likely Cause |
Fix |
|---|---|---|
Bitter, harsh cup |
Grind too fine |
Coarsen by 2-4 clicks |
Sour, weak cup |
Grind too coarse |
Fine by 2-4 clicks |
Sputtering flow |
Heat too high |
Lower the flame |
Watery coffee |
Underfilled basket |
Fill level, do not tamp |
Slow, stalled brew |
Too much resistance |
Coarsen the grind |
Bitter, Sour, or Weak: What Each Flavor Tells You
Bitterness usually points to over-extraction, which means the grind is too fine or the brew ran too long. Sourness points to under-extraction, which means the grind is too coarse or the water moved through too fast. A weak cup often means too little coffee in the basket or a grind that let water pass without picking up flavor.
Taste is your best feedback loop. Adjust one step at a time and brew again.
How Water Temperature Changes Your Grind Requirements
Water temperature shifts how fast coffee extracts, so it changes the grind you need. Hotter water pulls flavor out faster. If your water is too hot, a grind that normally works well can suddenly taste bitter.
A few practical rules:
- Start with preheated water in the base, not cold
- Keep the flame low so the pot heats gently
- Avoid boiling water that blasts through the bed
- If the cup turns bitter, lower the heat before changing the grind
A common mistake is blaming the grind when the real issue is heat. If your brew tastes harsh but the flow looked normal, try a lower flame before you touch the grinder.
Grind and temperature work together. When you change one, expect to adjust the other. Locking in both is what makes a moka pot repeatable.
Frequently Asked Questions
What is the ideal grind size for a stovetop espresso maker?
Aim for medium-fine, roughly 400 to 500 microns, or about the texture of table salt. The grounds should clump slightly when pinched but still feel granular, not powdery. This stovetop espresso grind lets water pass through the coffee bed at a steady rate without blocking the basket. Too coarse and the water rushes through, leaving the cup thin and sour. Too fine and pressure builds until the brew stalls or turns bitter.
Does a moka pot require a finer or coarser grind than a drip coffee maker?
Finer than drip, but coarser than true espresso. Drip coffee typically uses a medium grind around 600 to 800 microns, while espresso sits near 200 to 300 microns. Moka pot grind size lands in the middle. If you only own a drip grinder, start two or three clicks finer than your usual setting and adjust from there. Pre-ground drip coffee usually runs too coarse for a stovetop brewer.
What happens if my coffee grind is too fine for a stovetop espresso maker?
Over-extraction is the first result: bitterness, a dry or ash-like finish, and sediment in the cup. The basket can also clog, forcing pressure to build until steam escapes around the gasket or the safety valve releases. In severe cases the brew sputters and stops entirely. If this happens, back the grinder off a few steps, wipe the basket, and brew again with the same dose so you can isolate the grind as the variable.
Do I need a burr grinder for the best moka pot results?
A burr grinder gives you the particle size consistency a blade grinder cannot. Uneven grounds mean boulders and fines in the same basket, which causes channeling and unpredictable extraction. A manual coffee grinder for moka pot brewing with stepped adjustment, such as the Fiamma & Ferro Titanium+ with 180 settings, lets you repeat the exact setting that worked last time. Blade grinders produce a mix that shifts every batch, so dialing in becomes guesswork.